Invite: I created the invitation on Photoshop. I had to do some planning first to rearrange words to spell out the party details in Scrabble formations, but I think it worked out. I used a Scrabble board image for the background, and cropped each letter out of a Scrabble alphabet tile image I found online. I had to invent the tiles with numbers and the colon. The tiles don't pop as much as I wanted them to, but overall, I love the concept of the invite.
Entry Decor: I created a Scrabble board for the sign on my entry door. I bought two pieces of foam board to start. I cut one into 3"x 3" squares to use for the Scrabble tiles because I wanted the tiles to appear elevated above the board like a true Scrabble game. The remainder of that piece of foam board, I attached to the full board so my board could be wider. I used scrapbook paper for the background, border, and colored squares. I bought scrapbook paper that looked like wood to use for the tiles themselves, and the letters/numbers were cut out using my Cricut machine. In front of the board, I filled a vase with Scrabble tiles and placed a candle on top. The scrabble tiles I bought on Amazon.
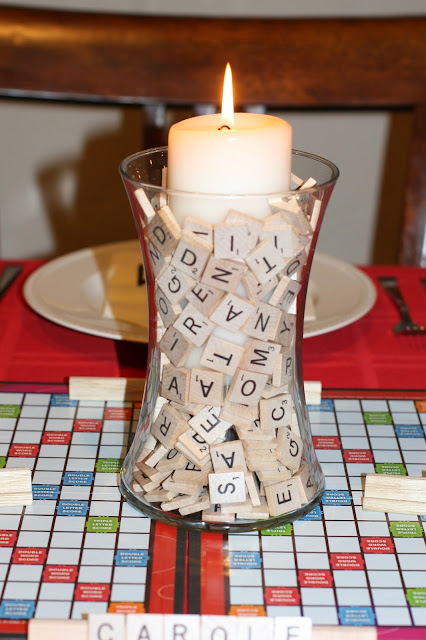
Inside Decor: One of my friends and fellow English teachers happened to have 6 Scrabble games in her classroom, so I lucked out in borrowing a lot of my decor. I set several of the Scrabble boards and boxes up around the room. I placed two boards as my centerpiece, and spelled out "Monthly" and "Dinner" using letters from the game.
I also filled my centerpiece vase with Scrabble tiles and a candle at the top. I placed a smaller vase inside to take up space and require less tiles to fill it.
For my napkins, I bought cream colored napkins from Party City. I used my Cricut to cut out the initials of my guests along with the corresponding number the initial would have on a Scrabble tile. I just set the black card stock on top of the napkin rather than gluing it which seemed more practical.
The place cards were simply the Scrabble trays with the tiles to spell out the guest's name.
I made wine labels on Photoshop to match our theme. Here is what the entire label looked like...
I filled a pitcher with water as well, and I attached an H2O label I created. The H is not really worth 2 points, but I altered it a bit!
For wine charms, I used the Scrabble tiles I bought from Amazon and screwed in some hook rings I bought from Ace Hardware. I used the first initial of my guests, and then tied them around the glass stem with red ribbon. The Scrabble board under and the box behind were fun decor additions.
Menu: I started with an appetizer of a cream cheese spread and veggies. The spread was just an Italian salad dressing mix packet and cream cheese with a little milk mixed in to soften it. I shaped it into a square and carved an S and a small 1 to make it look like a Scrabble tile. The picture isn't really good, but it did show up. If I were to do this again, I might use a strip of red pepper to make the letter/number so it popped more.
I found these Cheese-It Scrabble tiles at Walmart, and tried to find some way to incorporate them into my menu. I decided to use them as croutons in my garden salad!
For the main dish, I made ground beef turnovers and shaped them into squares. I made a slight indentation in the pastry to create a letter, brushed melted butter inside the indentation, and sprinkled poppy seeds on top of the butter. This recipe for turnovers takes a long time to make, but they are always a big hit....so yummy!
Green beans and berries were the other side dishes.
Just another look at the complete plate.
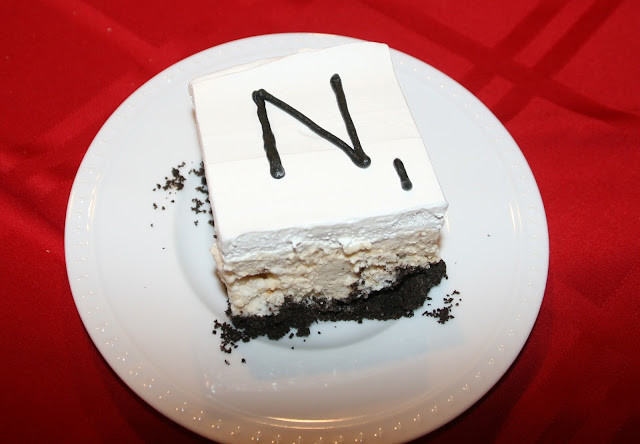
For dessert, I made an ice cream cake that I cut into squares and made to look like Scrabble tiles. It had an Oreo cookie crust, Heath bar ice cream in the center, and Cool Whip on top. I used frosting to pipe the letter/number on top right before serving.
Favor: I made mini Scrabble sugar cookies as my take-home favor. I made them small, so it was difficult for to me pipe the frosting letters (and especially numbers) on. I would try a frosting pen if I were going to make these ever again. I designed the tag on Photoshop.
No matter how you "spell" it, I have some great friends! Just love spending dinners with these ladies once a month!


