Showing posts with label Christmas. Show all posts

Thursday, December 14, 2023

Home Alone Christmas


I
t's the holiday season, and one of my kids' favorite holiday movies is Home Alone.  It is part of our family traditions to watch this movie together each year.  It made for a fun theme for my monthly dinner this December as well.


Invite:
I found some Home Alone images online that I incorporated into the invitation.  These included the stack of Little Nero's Pizza boxes, the movie logo, and the pizza can.


Decorations:
There are so many fun ideas for decorations that go with this movie.  You could boobytrap your home with obstacles for guests to weave through!  For my decorations, I kept it simple with just table and some other decor.  I set the table with a red tablecloth & a centerpiece with some of the Battle Plan hazards from the movie.


I covered a small paint can with black construction paper and added the word tar on the front.  I set this on top of piece of black sandpaper with the largest nail I could find sticking out the top for the part of the movie where Marv walks up the tar stairs and brings his foot down on the huge nail.


I purchased large paint cans and used my Cricut cutter to cut out paint drips in a few colors.  Even empty, these were a bit too heavy to hang from the ceiling, but I did attach them to the ceiling above the dining table.  These represented when Harry and Marv are clocked by the swinging paint cans in the movie.


Next on the table was a VHS movie of "Angels with Filthy Souls."  I printed out the labels from images online, and attached them to an old VHS of a different movie.  In front of the VHS, I had a crowbar and a BB gun like Kevin and Marv use in the film as wells hot wheels cars.


One of my favorite scenes in the movie is when Harry walks through the door into saran wrap covered in glue and then Kevin turns on a fan which covers him in white feathers! To incorporate this scene into my table, I added a box of saran wrap, a mini fan, and put some white feathers in the fan.


Another favorite scene is when Marv goes to turn on the light in the basement and an iron comes down the laundry shoot to smack him in the face. Hence...an iron as part of the centerpiece.


Lastly, I added a photo of Buzz's girlfriend with Kevin's famous line from the movie, "Buzz' girlfiend, Woof!"


For placecards, I printed out Kevin's mom's photo from when she realizes they forgot Kevin at home, and instead of her screaming out "Kevin!" I replaced it with each guest's name.


As a napkin ring/decoration, I put a box of Tic Tacs and created a ring with the line from the movie when the smoking Santa has run out of candycanes and gives Kevin two Tic Tacs instead saying, "There you go. Don't Spoil your dinner."


My daughter also drew out the Battle Plan from the movie on a piece of foam board that I used over the drink table.  I would traced it, but she's so talented she did it all by hand!


Just for fun, I also put a photo of Marv's face coming through the dog door on my wall.  I put some hot wheels in front it - another one of Kevin's hazards.


On my front door, I put a paper electric BBQ starter like Kevin uses in the movie to heat up his door handle.  I don't have a real one, so I just used scrapbook paper.


Coming up with sayings to put my wine bottles is always fun.  For my red wine, I decided to use the famous line from the movie during the battle when Kevin asks, "You guys give up or ya thirsty for more?"  I simply added "red wine" to the end of this phrase!  For the white wine, I played off the part in the movie where Kevin thinks he made his family disappear and then challenged the guests to make the white wine disappear.  I also served a rose wine.  For this label, I used the lines from when Kevin's mom calls the police station and talks to Rose, then gets transferred to another cop, then this cop sends the call back to Rose saying, "Rose, hyper on 2."


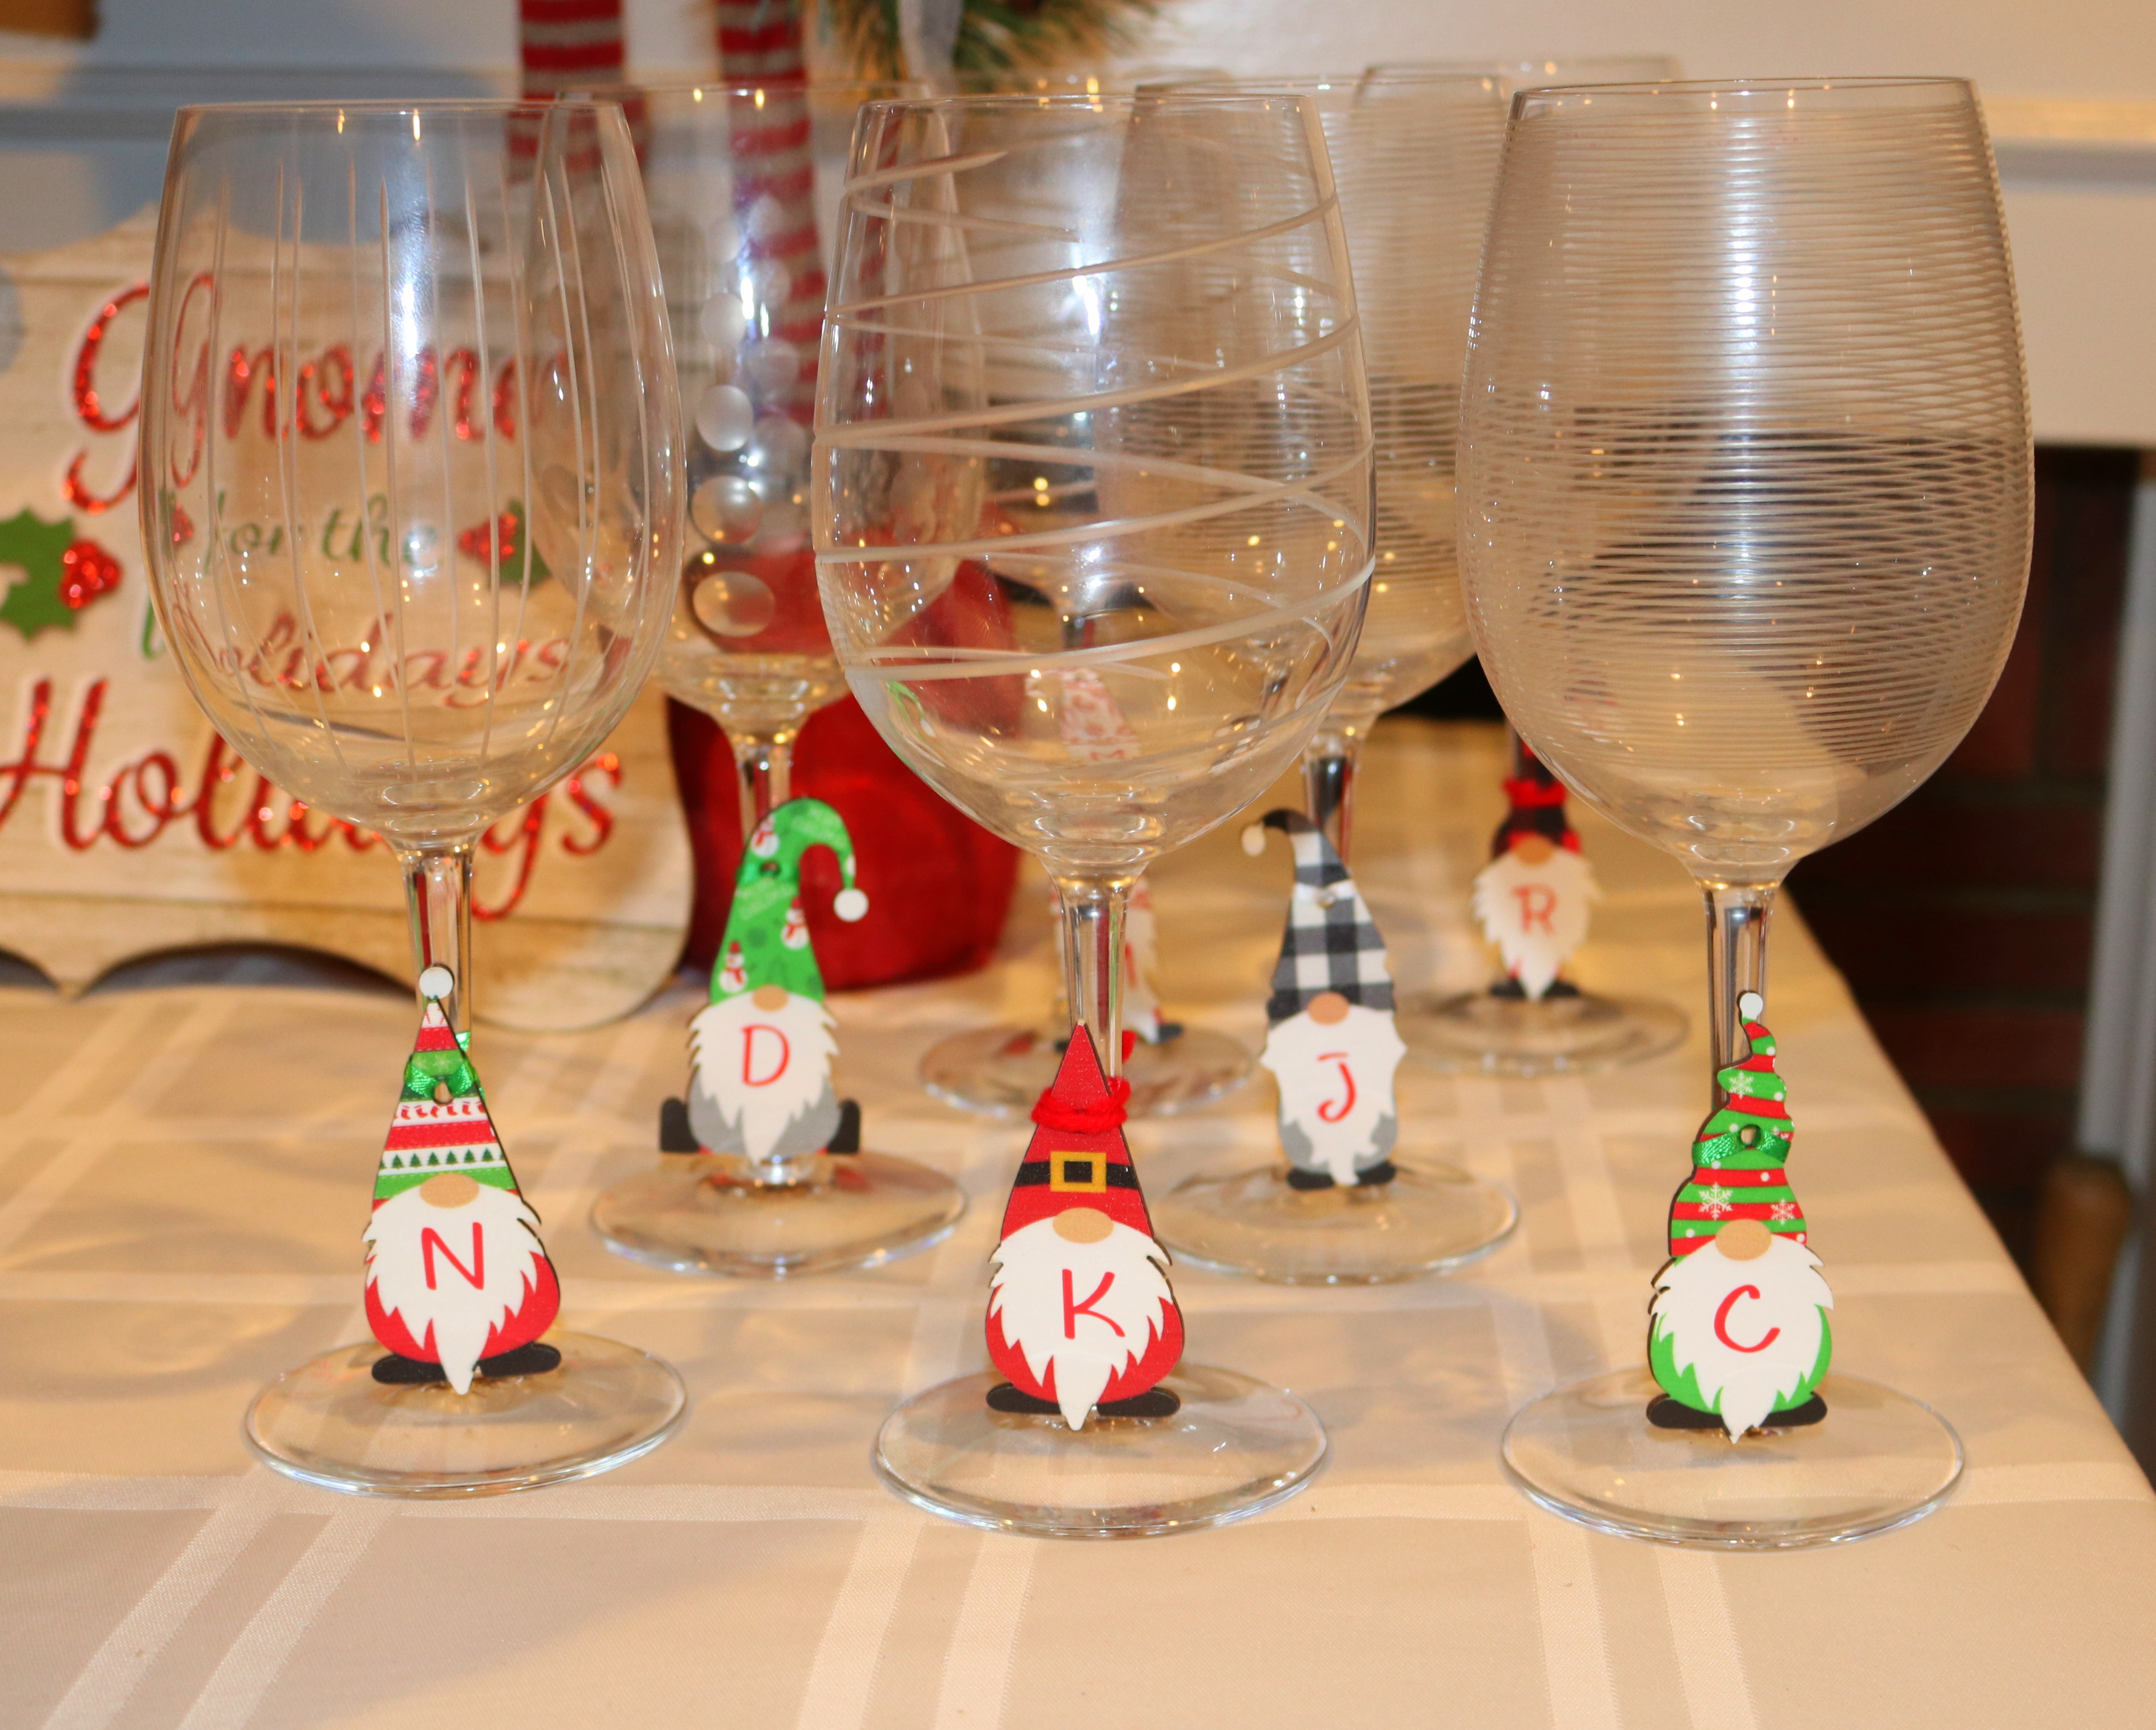
For wine charms, I cut out iconic people or items from the movie.  Some of my favorites were the Michael Jordan cutout used to fool the robbers, the "Kenosha Kickers" jacket that John Candy wore with is polka band, a bottle of Brut aftershave for the famous "AAAHHH scene," and a toothbrush "approved by the American Dental Association." 


Menu:
I wanted to incorporate Buzz's tarantula from the movie into the evening somewhere, and I didn't think I could handle having even a fake one on my table while we ate, so I decided to incorporate it into my menu. I made mini tostada boats and cut olives to look like spiders.  The boats were simple with refried beans, taco seasoned meat, cheese, tomatoes, and lettuce, sour cream was piped on to look like a spider web, and then the spider olives went on top of that. 


For a main dish, we of course had pizza as Kevin orders "a lovely cheese pizza just for me" in the movie after he doesn't get any of the pizza when the whole family is there.  I went to my local pizza joint, and purchased a pizza box.  Then I covered the top with white posterboard and created a Little Nero's Pizza logo to put on the top.  I made a pizza, but cheated a bit by adding pepperoni and mushrooms after asking the guests their topping preferences.


I also served a caesar salad. I took the line from the movie when Kevin's sisters taunts him with, "You are what the French call les incompetents" and just replaced the last two words with la salad Cesar (cesar salad in French).


Right before the robbers invade the McCallister home in the movie, Kevin makes himself a microwavable Mac and Cheese dinner.  I incorporated this into my menu by making macaroni and cheese cups in muffin tins.


For dessert, we had Rubbish Ice Cream sundaes.  A small ice cream sundae bar with toppings.


Favor: I was pressed for time and needed an easy parting favor for guests.  I purchased cans of Pepsi and red striped straws.  My tag read, "Fuller! Go easy on the Pepsi!" to go with that line from the movie when Fuller's parents are trying to limit his soda intake.


This was a fun night with my girlfriends.  I did purchase or borrow a few things to make the decor happen, but most of it I had around my house (like Kevin did).  This kept my costs for decor low.  I would totally recommend this theme for a holiday movie night or dinner with friends.

Sunday, December 11, 2022

Chillin' with my Gnomies

Gnomes are all the rage right now, and why not? They are so cute!  I decided to theme our December monthly dinner around gnomes with a Chillin' with my Gnomies party!  This was super fun to create & we had a blast eating our gnome-themed food, painting our gnome craft, and of course hanging with our gnomies to catch up.


Invite: 
Since this was a holiday party, I designed the invitations with red, green, and white as the accent colors.  I purchased a design of a gnome on Etsy, and after getting permission from the designer, I used this same gnome on much of my party decorations including the invitation.


Decor: 
I purchased a few items for this party, but most of the amazing gnomes I borrowed from friends.  For the dining table, I used two snowflake decorations I already owned as the centerpiece along with lots of gnomes.  The cute MERRY gnomes were borrowed.  The two gnomes on the each end of the centerpiece were wine bottle covers that I purchased from Amazon in a 4-pack and just placed these two on pint glasses.


For a place card, I used the gnome from my invitation, and just added each guest's name to the beard.  Instead of napkin rings, I folded a green paper napkin into a hat to add to the place card.  Easy and cute.


For my beverage and favor table, I borrowed these amazing gnomes for the table and the mantle.  I love them so much, and they really added to the decorations.


The beverage and favor table.


Instead of designing wine bottle labels, I purchased these gnome bottle covers from Amazon to use.  As stated above, they were a 4 pack and I only needed two for wine, so the other two created gnomes for my centerpiece.


For wine charms, I purchased these small wooden gnomes from Amazon. I was originally planning to use them as place cards, but when they arrived and were smaller than I anticipated.  I decided to use them for wine charms instead.  I used my Cricut to put the first initial of each guest on the beard.


Outside, I borrowed this blow-up gnome for my front yard to welcome guests to the party. 


Menu:
  Turns out, the only gnome food ideas I found online were desserts, so I had to invent my own meal. We started with a Gnome Garden (Salad).  I cut radishes to look like mushrooms.  On top of the green spinach, I added garbanzo beans, feta cheese, and pecans. Guests could choose either an Italian dressing or a Balsamic Vinaigrette.


I decided to make Gnome-made giant meatballs wrapped in bacon along with mashed potatoes for the main meal.  Although they don't look amazing, my attempt was to have each one look like a gnome head and beard.  I made mini party hats with holiday cardstock to place on top.  For this dinner, I used ground turkey instead of ground beef.  I think the balls would have stayed a bit more round with beef, as the turkey was harder to shape into a ball and flattened a bit in the oven.  For the nose, we just used garbanzo beans.


I made these holiday gnome cupcakes for dessert.  I dipped the waffle cones in red candy melts to give it a little something.  The beard, nose, and green body is gnome-made frosting.


Party Activity: At our December monthly dinners, I always like to have some sort of craft for us to do.  I wanted to make it a simple one that could be done in a short amount of time, so I opted for painted wooden gnomes.  Love how they came out.


My husband cut all the 2x4 pieces of wood before the event.  They were around 10" tall and sanded. I couldn't find wooden circles at the craft store, so I bought brown/tan pom poms to use for the noses.  For the beard, guests could choose from craft fur or a white mop.  The mops are from the dollar store and each mop can make a ton of these gnomes.  The craft fir can make a few gnomes, but is more expensive.  Some guests made eyebrows for their gnome, some did not.


Our first finished gnome of the evening.


Love this spirited gnome my friend painted for her young daughter.  She even painted the mop strands of the beard slightly.

Forgot to get a group photo at this dinner, but we had a great time together to close out our last monthly dinner for 2022.


Saturday, January 1, 2022

Ho - Ho - Hoedown Country Christmas

Ho - Ho - Howdy Y'All!  Buffalo plaid is everywhere this Christmas.  I love it, and it reminds me of a hometown Hallmark movie-style Christmas.  I decided to keep my theme simple this December and host a Country Christmas with a Ho - Ho - Hoedown monthly dinner. Check out the details...


Invite:
A buffalo plaid background and Santa strumming an acoustic guitar were of course part of my design for the invitation. You can't have a Ho-Ho-Hoedown without featuring Santa!  Beyond that, I kept the invitation simple and just used a country-style font for the writing.  I asked guests to wear flannel and boots to the party for added fun.  Plus, I hosted the dinner outside on my patio, so I wanted the guests to dress warmly.


Decor:
It was so easy to find buffalo plaid everywhere, that I used it throughout my decor.  I set the table with a red tablecloth & cut a strip of buffalo plaid wrapping paper to use as a table runner.  I could have purchased a fabric table runner for $15, but I already have a holiday table runner in my house, so $2.50 on a roll of wrapping paper that I could use for wrapping presents and making a table runner, seemed like the way to go.


As a centerpiece, I placed my cowboy boots in the center of the table runner.  I filled one of my boots with mini Christmas ball ornaments, and the other I placed a buffalo plaid Santa hat I bought at the dollar store.  I borrowed some mini haybales and copper wire from a friend to place on the table as well.


Lastly, I added a wooden buffalo plaid Christmas tree I made.  I found the wooden tree at the dollar store, purchased the buffalo plaid scrapbook paper from Michaels Craft Store, and just used Mod Podge to adhere them together for a fun look.  I added some wooden trees and plaid reindeer I borrowed from a friend.  She found the reindeer in the dollar bin at Target.  


For my napkins, I designed a simple cowboy boot with a Christmas tree in the middle to cut out of cardstock with my Cricut machine.  I made a plain back of the boot, and used scrapbook glue to glue the bottom and just the rims together.  Then I slid a green napkin into the top of the boot.  Love how they turned out.


I had a bit of silly fun with placecards.  I asked each of my guests to send me a bitmoji of themselves.  I chose a specific bitmoji to have them send - one where they were facing front and I could easily Photoshop the rest of the bitmoji out and just have their head.  Then I found clipart cowboy cartoons online and replaced those faces with those of my guests!


Here's a few more just for fun!


For wine charms, I made ball ornaments out of scrapbook paper to wrap around the wine stems.  These were super easy.  Except for the red buffalo plaid, I found images of holiday plaid online to use instead of purchasing cardstock.  I just printed the backgrounds on cardstock large enough for the ornament, and then used my Cricut to cut them out.  A little silver glitter to add the ornament top, and they were done.


I designed my wine labels to match the invitation and the overall country Christmas theme.  For the red wine, I designed a wine glass with a horseshoe as the cup and made it like a "Wanted" poster - glass or bottle.  For the white wine, I went with a simple holiday phrase "Tis the Season to be Drinkin".


This small Ho-Ho-Hoedown banner was above my drink table.  Instead of using scrapbook paper to make it, I just designed it on Photoshop and then printed it out.  I was short on time, so simple worked for this.


Menu:
A Ho-Ho-Hot Chili made in the crockpot was my main dish, and what a good choice it was!  It was delicious, warm on a cold night, and because it was in the crock pot, it really gave me a chance to relax a bit and chat with the girls instead of being stuck in the kitchen the beginning of the party.  I used this recipe.  We liked it so much, I made a second batch later in the week for my family to enjoy.  I set it out with all the fixings for guests to add as desired: cilantro, jalapeños, onion, sour cream, avocado, cheese, hot sauce, and red and green tortilla chips.


Along with the chili, I served Ho-Ho-Homemade Cornbread and Ho-Ho-Homestyle Corn on the Cob.  A bit of a stretch because although I did make the cornbread in my home, it was from a box from Trader Joe's.  If you haven't tried Trader Joe's cornbread mix, I suggest you do. It has little bits of corn in it, and it is really good.


For dessert, we had Ho-Ho-Howdy Cupcakes.  These were simple cupcakes baked in buffalo plaid wrappers with vanilla buttercream frosting, but with an editable cowboy hat on top!  They were so adorable!  The hats are made with Lays Stax chips to give the base of the hat the authentic look.  You could use Pringles, but Lays Stax chips are thicker so it's less breakage when you dip them in chocolate.  The top of the hat is a Rolo and then a red pull-apart licorice for the red accent.


Favor:
 
I initially intended to make the plaid wooden Christmas tree as a favor that I made for my centerpiece, however, after going to 6 different dollar trees to look for them and only coming home with one, it wasn't going to work.  Instead, I found the wooden door hangers at the dollar store.  I used Mod Podge to glue the buffalo plaid on the wood, and cut out the tree and Merry Christmas with my Cricut.  This favor was definitely simple and inexpensive to make.

Ho-Ho-Hope you had a wonderful Christmas!