Showing posts with label School Themes. Show all posts

Sunday, May 15, 2022

Running on Fumes Monthly Dinner

This school year is killing me.  The student behaviors and apathy after a year of distance learning combined with the challenge with administrative support have just worn me out.  At this point in the year, I am just running on fumes.  The finish line can not come soon enough.  With so many of my friends in a similar state, I thought this would be a fun theme for a monthly dinner....and it was!


Invite: 
I designed my invitation on Photoshop.  My goal was to focus on a vintage-like feel and gasoline "fuel" rather than a simple car theme.  I found an image of an old school gas pump online and decided to run with that as the main design for the invitation and all my decor.  My color scheme was black, white, red, and yellow to match a street and the gasoline pump.


Decor:
I set my table with a bright red tablecloth and created a street with black and yellow card stock as a table runner.  Borrowed an empty gasoline can from our garage for the centerpiece along with a car and gasoline related decor I found at Hobby Lobby.


At each place setting, I folded a black napkin and made a street out of it with yellow card stock.  I placed a Hot Wheel on one side of the road.  


For place cards, I designed California license plates for each guest.  I added a 2022 registration sticker in the right corner and a MAY registration month in the left to match the party date.


Above my beverage/appetizer table I hung these gasoline signs I purchased at Hobby Lobby.


I designed this fun Mobil sign to put next to my wine. Instead of a Food Mart, this was a Self Serve Wine Mart.  I found a font that looked like the digital numbers used on gas station signs, and had fun creating "prices" aka levels.  Regular gas = SOME, Extra gas = HALF, Supreme gas = RIM with an image of a full wine glass.  Guests were encouraged to "Fill 'Er Up!"  To stand it up, I used silver straws and chocolate donuts to look like tires.


I designed my wine labels to also match the theme.  For the white wine, I found an image of a yellow gas pump and then designed the label to look like the gas was being poured into a wine glass with the note "Top 'er Off!"  For the red wine, I used an image of a girl pulling on a gas lever and just changed the gas sign to a wine glass.  Then I added Running on Fumes and "Please Refill Glass."


For wine charms, I kept it simple.  I used popular gas station logos.


Menu:
I must admit, I really struggled with coming up with a menu that fit my gasoline theme.  I almost gave up on this Running on Fumes theme because I was struggling so much, but I eventually came up with some things and I think it turned out nice.  We started with a cheddar cheese ball appetizer.  The recipe called for the green onion, bacon, and cheddar cheese to be both on the inside and the outside, but I kept the bacon and green onion only on the inside because I wanted my ball to be orange like the 76 gas station ball.  Don't worry...all that yumminess just went inside instead of out!  I made the 76 numbers out of card stock, attached them to a push pin, and stuck it in the center.  This appetizer was delicious and cute!


For the main dish, I served Cheesy Stuffed SHELLs to represent Shell gasoline.  This recipe was good and fairly easy. All the menu cards I designed to match the invitation.  I simply swapped out the generic gas pump topper with the Shell logo, and then added a vintage Shell sign to the bottom of the pump.  I did this same thing with the appetizer 76 menu card as well as the other dishes.


With the pasta, I served Texas Toast which I renamed TEXACO toast.


We also had a Go Green Caesar salad.  For this menu card, I used a green gas pump with logos of "green" gas stations.


For dessert, I made jello cups.  I originally wanted to make the jello into chevrons to match the Chevron gas station logo, but that was too time consuming.  Instead, I just went with the colors and the order of Chevron's logo.  Topped the jello cup off with a dollop of whipped cream and some red sprinkles.


Favor: 
I wanted to make gasoline pumps as my favors. I bought mini boxes about the size I wanted my favors and filled them with candy.  I then designed a wrap to cover the outside and top of the box using the gasoline pump from my invitation and other items.  


For the actual pump, I cut red bendy straws for the pump, and hot glued a mini binder clip to the side of the box to hold it.  I glued one side of a piece of black string to the inside of the straw and the other near the bottom of the side.  Then covered the bottom string with a black button. Time consuming to cut these out and assemble them, but super happy with how they came out.

Another fun party in the books.  I think this would be a fun theme for Teacher Appreciation Week too! The friendship and laughter from the evening definitely gave us a chance to Refuel and Recharge for the remainder of the school year.

Saturday, October 17, 2020

Celebrating 14 Years Shakespeare-Style

Hard to believe, but I have been hosting monthly dinners for 14 years!  That is 168 themed dinners that my girlfriends and I have had over the 14 years.  A lot has changed over those years of course -- many of us have gotten married, had children, bought homes, changed careers, and so much more.  What hasn't changed is our joy in getting together, even if it is only once a month. Unfortunately, our celebration this year was on Zoom due to COVID-19, but we still had a good time.

For our "anniversary" dinner, I typically try to come up with a theme that reflects the number of years. I must say for 14, I was completely stumped.  Sometimes a number will go with a movie (13 Going on 30 was last year or Seven Dwarfs was year seven), but 14 was a challenge.  I brainstormed with a friend, and decided on Sonnets - they are 14 lines!  It is a very "English-teachery" theme, but a few of us are English teachers, so what the heck; I went with it!

Invite:  Being the over-achiever that I am, I decided to write my own sonnet to put on the invitation.  For those of you that don't know, a Shakespearian sonnet has 14 lines, 10 syllables in each line, and a rhyme scheme of ABAB, CDCD, EFEF, GG.  Piece of cake, right? Nope. It was bit of a challenge and I only had the weekend to pull this whole dinner together, so it's a good thing my friends aren't grading me!  It was fun to create, and I added Shakespeare wearing a party hat to the invitation for added fun.  I downloaded a free font called Shakespeare First Folio for the text.  Just FYI if you use this font, the "u" looks like a "v"  and the "j" looks like an "i" in this font.  I had to switch to a different font just for certain letters.


Party Details: 
Shakespeare wrote with a quill and parchment, so I wanted to incorporate this into my dinner details.  I rolled my napkin like a scroll and added a homemade quill.  I couldn't find large parchment colored napkins without spending a fortune, so I just used grey which I already had at home.  You do need dinner-size napkins which are larger.  To make the quills, I bought feathers from Michaels Craft Store and black pens from the dollar store.  I cut the tip of the feather, took apart the casing on the pen, and then slid the pen inside the feather.  I did have to cut the plastic tube that holds the ink so that it wasn't as long (which means the quills won't last very long), but it worked.  I used a bit of black electrical tape to secure the pen to the feather.  Quick and easy. 


With COVID, not being together at one table for these dinners to share a bottle (or two or three) of wine really bums me out, but we've adapted.  For my mini wine bottle labels this month, I decided to alter a popular Shakespeare quote.  Switching the "thine" or "wine," I made a label that read "This above all / To WINE own self be true."


Menu: 
I typically try to be creative and make each food item somehow match the theme for these dinners, but a sonnet theme made this more challenging than usual.   I decided instead to make popular foods from England, as Shakespeare was a Londoner.  I wrote another sonnet about the food itself instead of naming each menu item separately.


The main course was bangers and mash.  I followed this recipe.  I bought sausages from the grocery, not true bangers.  The sauce and the onions were delicious (and I don't normally like onions).  The guests really liked this recipe.  Along with the bangers and mash, I served fresh carrots and peas.


For dessert, I made a caramel brownie chocolate trifle.  I bought plastic mason jars from Michaels to put the trifle in, so it was easy to transport.  The trifle was super easy to make.  I baked brownies and crumbled them up to layer with the other yummy ingredients.  Crumbled brownies, then a caramel drizzle, chocolate pudding, whipped cream, then cut up Heath bar.  I repeated these layers until the mason jar was filled and Heath bar was on top.  Helpful hint: Pipe the pudding and whipped cream in to avoid messing up the sides of your mason jar.  It gets a cleaner look.
Although the menu sonnet included a stanza on dessert, the lid of the mason jar was so plain, I decided to add a tag. I used Shakespeare's line "Something wicked this way comes" and added in a word to read "something wicked(ly) chocolate this way comes."


Favor: 
I made Shakespeare "books" out of cardstock and a box of chocolates for a parting gift.  I found a box of chocolates at the dollar store and designed the dimensions  of the book to fit that box.  On the spine I had the title of our evening "Sonnet XIV - Ode to 14 Years" and I used a famous line from Romeo and Juliet on the cover.  "Good night, good night / Parting is such sweet sorrow/ That I shall say good night / til it be morrow."

So happy to have been able to host these dinners for the past 14 years and to have built such amazing friendships with these ladies over those years.  A final rhyming couplet to end this post and dinner: "To dine or not to dine -- no question here. / We loved to celebrate our fourteenth year!"


Sunday, August 18, 2019

Kickoff to Kindergarten

My youngest daughter started kindergarten this past Monday.  She was so excited to start the year, and we are excited to see her grow and learn.  With all the back to school supplies in stores, I decided to make this milestone the theme of my monthly dinner.  Even though these dinners are for my girlfriends, I had my kindergartner help with some aspects of the party. So fun!


Invite:  I designed the invite on PhotoShop using lots of bright colors.  I used a Kindergarten font for most of the text.


Entry Decor:  My husband found this easel at a thrift store for $5 a month ago, and it made the perfect entry.  My 5th grade daughter wrote the theme in chalk to match the invitation. For the door sign, I used a Welcome sign I already owned and added "Class of 2032" and a classroom bulletin board border I grabbed from the dollar section.  By the way...can you believe my daughter is the Class of 2032? Seems like forever away, although I imagine it will be here before I am ready!


Table Decor:  I had a lot of fun decorating the table.  Lots of bright colors and fun school items made it easy to throw together.


For the centerpiece, I bought 20 rulers from Target to lay on the table as a small table runner.  On top of the rulers, I had the giant wooden pencil that I made for my Teacher Appreciation monthly dinner in 2017.  You can find the tutorial on how to make it here.


I found the crayon holder and the red box at Target.  I filled them with school supplies I already own.  The letter flashcards I also got at the dollar store and the addition flash cards I made out of cardstock.


I used a can to make this colored pencil holder.  The composition book was part of the bulletin board set I got, so I just cut it to fit around the can and glued it.


I love how cute the place settings turned out. For the placemat, I printed out an image of kindergarten lined paper as large as I could make it for an 8.5x11 piece of typing paper.  I did this twice for each place setting, and then cut and taped the papers together to make it taller than the plate on both sides. I used red paper plates from the dollar store and cut cardstock to make an apple stem and leaf.  The mini chalkboards I found at Michaels.  I used my Cricut to cut vinyl letters to match for each guest.


For the place card, I had my kindergartener write each guest's name on these bulletin board cards I bought from the dollar store.  She did such a good job, and the guests loved the personal touch!  I bought mini playdough and sliced the top of each lid to use as a holder for the place card.


The napkin ring was made from rulers I found in the same $3 bulletin board pack that had the composition books and the colored pencil border from the entry sign (and banner which you can see below).


This banner was super easy.  I found the pencils and the notebook paper already created on Pinterest, so it was a free download for the letters I needed.  The colored pencil border was from the bulletin board pack.  I just cut them apart to use for the banner.


I always have fun trying to create something clever for my wine labels.  I'm pretty happy with what I came up with this time.  Kindergartners start to learn how sounds can be made into words, so I designed my red wine after that idea. Bed, fed, and red for practicing the -ed sound.  Since kindergartners also learn to write, I crafted the wine wine to just switch out "write" for "white" and created a pencil as the background.  The menu cards I used throughout the party, this one being W is for Wine.  My older daughter helped color them.


For wine charms, I went simple and just tied crayons with ribbon around the stem of the glasses.  Simple and easy.


Menu:  You could do anything for your menu.  If I had this party for kids it would be different, but since my guests were all adults, I tried to use the alphabet letters to create a theme.  We started with A is for Apple Walnut Salad.  The salad included spring mix, sliced apples, blueberries, walnuts, and crumbled goat cheese.  I served it with a honey balsamic vinaigrette.


For the letters B and C, I served Biscuits and Carrots.


For the main dish, I made Chicken Drumsticks baked in the oven. I made a garlic-Parmesan sauce which gave them even more flavor.


F is for Fruit.  To round out the meal, I made a simple fruit salad with just watermelon and blueberries.


For dessert, I made these cute pencil cupcakes  I designed the wrapper on Photoshop and piped on the frosting.


Favor: Pencils made out of toilet paper rolls and cardstock were my favor.  I filled each with taffy.  These were a challenge to make with a bit of trial and error.  The key for me was to make the cones for the pencil part and glue them in place first.  It didn't work well to do the eraser side first.  After the tip was in place I added the taffy and glued the eraser in place.  Lastly, I glued the gold paper and wrapped the silver vinyl before adding the No.2 to the top in vinyl.


My daughter loved her first day of kindergarten, and the fact that this party was themed in her honor.  Milestones go so quickly, it was fun to capture this memory and celebrate it.  Hope you enjoyed seeing this fun party!

Monday, January 15, 2018

PUN Party = Fun Party

Who doesn't love a good pun?  Puns -- play on words - make small jokes exploiting the various definitions of words we have in the English language.  As an English teacher, I love a good pun...gets me giggling every time!  So January's monthly dinner theme was all about puns, and I had so much fun coming up with puns for the decor, the food, the place cards, the favors, and anything else I could think of for this party.

Invite:  I wanted to incorporate as many puns into my invitation as possible. I think I got 4 in this one.  I chose the blue shades and burgundy as a color scheme because these were colors used in the toasting plates image and the "Pun Party" banner images I found online, but any color scheme would work perfectly for this party.


Entry Decor:  The night of the party it was raining, so I had to bring most of my outside decor inside. If you follow my blog, you know that our last party was a HO HO HOme Depot party where guests made a wooden Santa or a Snowman.  This is the snowman I made at that dinner party.  I just added a pun to it.


On the door, I used my Cricut to cut letters to spell Dumble (as in Dumbledoor from the Harry Potter series).  I put the his symbol from the novel as well.


This sign would have been outside as well.  To "whale"-come or welcome guests to the party.


Table Decor:  I had a lot of fun with the puns for the table.  I started with a centerpiece of four different puns.  I created speech bubbles with the puns to attach to each item so guests could understand the pun.


My favorite was the loaves of french bread that I cut to look like slippers/loafers.  These were super easy to create.  Just cut off half for the back of each loafer, and then scrape away the inside where the toes would go and a bit of the entire bottom. It's true...I love "loaf-ering" around with these ladies.


Also in the centerpiece was a bouquet of "carnation" flowers. I bought Carnation instant breakfast packets and some fake flowers.  I took off the flowers and replaced them with Carnation packets.  A pun with the French thank you - merci beaucoup became Merci Bouquet.


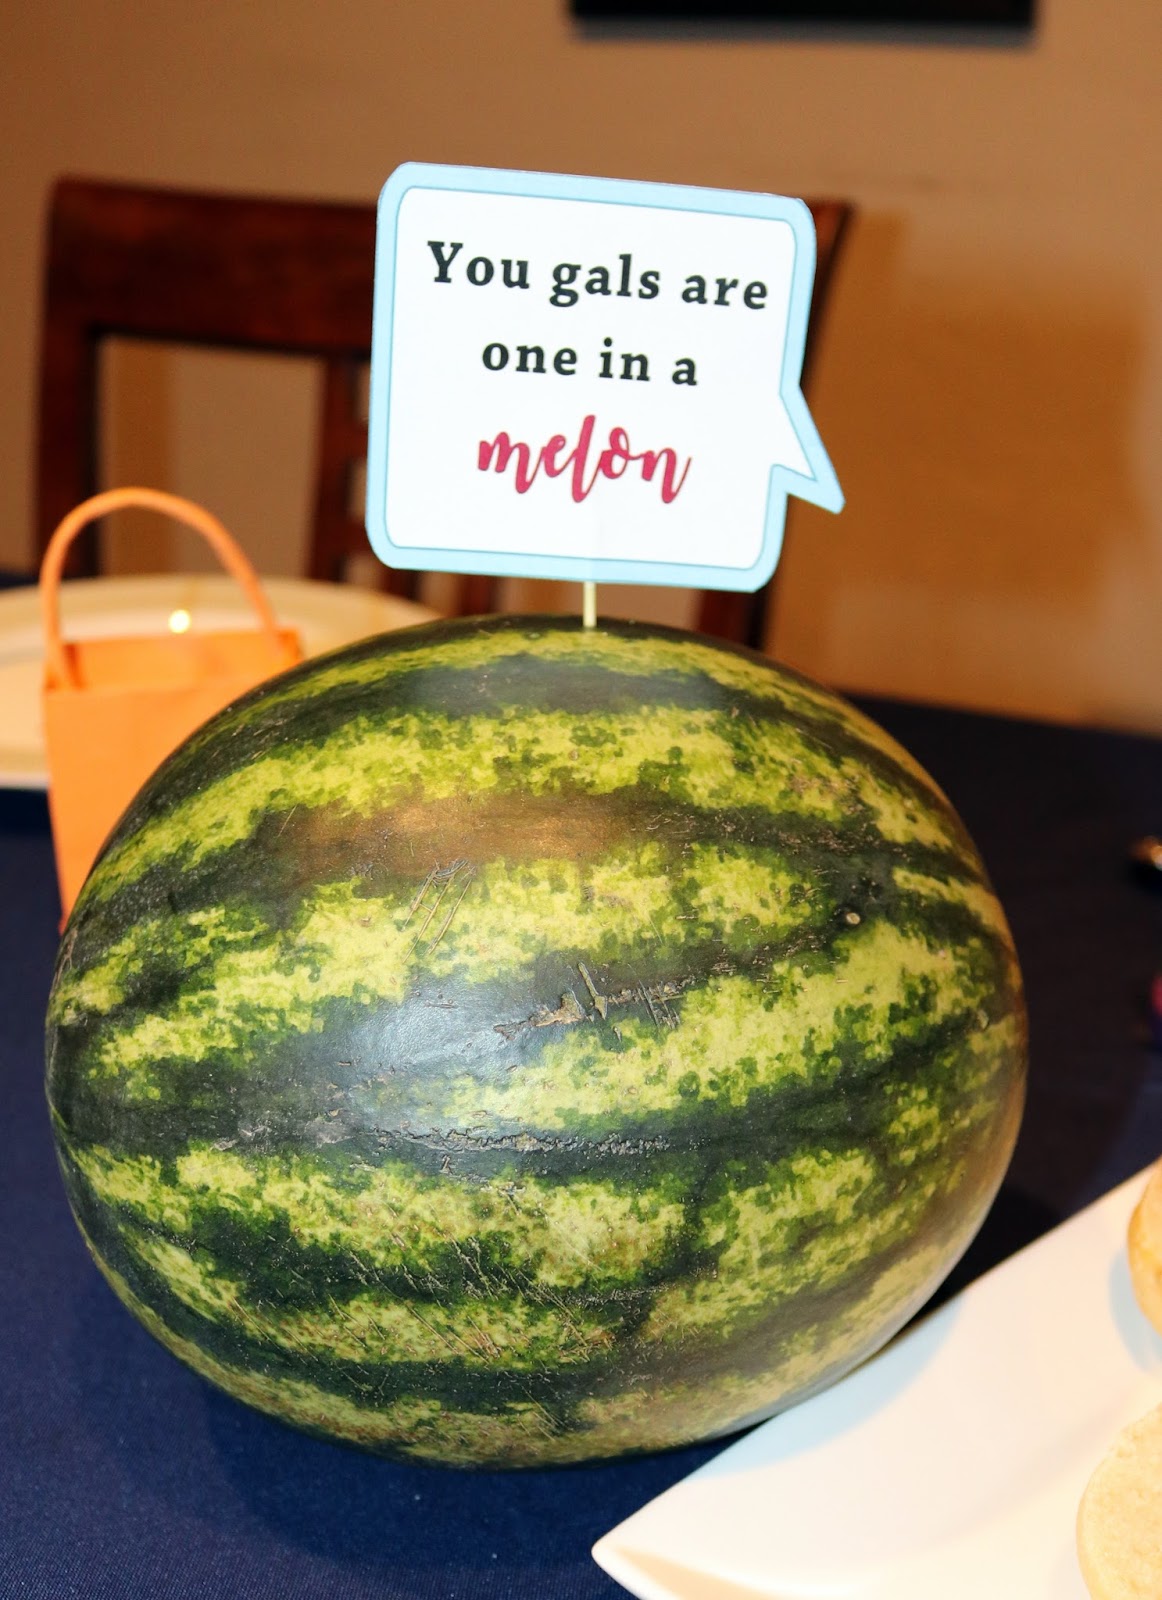
I also bought a small watermelon and a bottle of Heinz ketchup.  The watermelon for the pun "You're one in a melon (million)" and the ketchup for "Great to Ketchup (catch-up) with you."


On each plate, I made a small insert that I printed and placed in the center.  It encouraged guests to "eat your heart out."

For placecards, I wanted to come up with a pun with each guest's name.  This is a huge challenge.  I only had 6 ladies able to attend this party, so it was easier than trying to do it for a huge crowd.  Here's some of the ones I came up with for my friend's names:


When thinking of puns to go with guest names, you may need to try both first and last names.  I even had to do one friend's nickname because I couldn't think of any good puns for her first or last name.


For napkin rings, I used ring pops and carrots to create "one carrot (diamond) rings."  My kiddos enjoyed eating the ring pop suckers.  Then I washed the rings, carved a hole in a carrot with a screwdriver, and then put the carrot onto the ring.  You could add a diamond cut out of card stock under the carrot which might make the pun even easier to understand.


I made this small sign on PhotoShop to put on the drink table.  Parties are great chances to "wine (wind) down and (gopher) a drink".  I had a little clock next to the sign, but it kept disappearing...gotta love my kiddos!


I designed these wine labels for the three wines I served.  The red wine one "well red (read)" has open books designed behind it.  The chardonnay one is lyrics from a popular song right now.  "Now watch me Sip on Chardon-NAY NAY" instead of "Now watch me Whip; now watch me NAE NAE" song.


For wine charms, I made FACEcards.  A facecard is the Jack, Queen, and King in a deck of cards.  To make the pun, I just used Photoshop to put a photo of each guest's face in place of the queen's on each card.


Menu:  There are so many puns that go with food, so coming up with my menu was pretty easy.  I made menu tags to match the invites and other party decor.  For food, we started with a simple salad - romaine lettuce, cucumber, corn, bacon, and shredded cheese.  I used a "salad (solid) gold" pun as well as a "lettuce romaine (let us remain) friends forever" pun.


I made Cool Ranch Chicken for the main dish.  This is super easy to make and yummy (even my kids like it).  Alongside the chicken, I had a bottle of Ranch dressing that I added sunglasses to make it "cool".


For sides, I served green beans and cilantro lime rice.  "Thanks for bean-ing (being) great friends" and "Lime (I'm) glad we're friends."


For dessert I made a fruit tart with strawberries, kiwis, and blueberries.  It's Nilla wafers and butter for the crust, vanilla pudding and whipped cream for the middle, and fruit for the top.


Favor: Each guest took home a cheese grater I found at Dollar Tree.  I used a cookie cutter to cut a slice of cheese into a heart to attach to each grater.  I attached a tag to the front that read "I know it's CHEESY, but I am GRATE-ful for you!"  The girls loved them.


All in all, we had a PUN (fun) night.  Most of the guests came dressed up as a pun.  Pictured here from left to right:  Hawaiian punch, baking soda, chip on your shoulder, Freudian Slip, and Sugar Mama (she's got a bag of sugar wrapped in that baby blanket).

Hope you enjoyed this post!  Would love to hear your comments!